

As promised a post on one of the easiest to propagate houseplant – pothos! Figured I was over due for a post on plants after 3 back to back recipe posts. Heads up, next post after this one, my recipe for Bacon Cheeseburger Pizza! Come for the plants stay for the recipes!
This method also applies to plants such as philodendron (trailing versions), scindapsus, and monstera. I prefer to root them out in water first and then transfer them to potting mix once they have a decent set of roots. I’ve just found this to be the easiest way for me.
So hello to my Marble Queen Pothos.

I’ve had her for quite awhile and she’s had some good growth (granted her sister Manjula is currently beating her out, but I took Manjula cuttings about 2 weeks ago, so it’s Marble Queen’s turn). You can see that long runner, that’s our target for propagation.

But first an up close pic of the leaves, isn’t she gorgeous!

I got both of these plants at the same time and they were about the same size. Here’s Manjula. See what I mean?

When I take cuttings on plants like a pothos or monstera, I will take each individual leaf and make it into a cutting, once they root I usually put 2 to 3 rooted cuttings in a pot depending on how big the cuttings are. With all the plants I mentioned above you need to make sure that your cutting includes a node. That’s the spot where the leaf attached to the stem and where new roots will grow. If you only take the leaf and no node, you won’t have any success. Below is a picture pointing out the node.

See that little brown bump? That will eventually turn into a pretty white root when the cutting begins to root out. You can see where the leaf is attached and the node itself is a slightly swollen area.
NOTE: When taking cuttings make sure the plant and leaves are healthy. A plant in poor healthy may be harder to root out then a healthy plants. Always make sure to leave plenty of leaves on the mother plant to recuperate after you’ve removed the cuttings.
When I take cuttings, I make sure the stem between the leaves is trimmed down (that space is also referred to as an internode, the more you know!) The picture below is right after taking the cuttings from the Mom plant. You can see a little extra stem on some of them.

And this is what one looks like after a little trimming.

The next step is easy, find a container that can hold water and put your cuttings into the water. You can use anything really, just make sure it’s clean. I use spice jars, pottery, mason jars, jam jars, etc.

The important thing is to make sure those nodes stay submerged in water.

It’s going to take a number of weeks before you’ll be ready to pot up your cuttings. These are Manjula pothos cuttings I took 2 weeks ago. We did a mega spring cleaning of our dining room and living room and this required all the plants to come out of the windows so we could clean some very dirty windows (go go double hung windows for making it easier to clean the outsides of the windows!). This led me to some reorganization of plants and some propagation of a very long Manjula. The picture of her above is AFTER I took a few cuttings. This is 2 weeks of root growth on those cuttings.

If you look really close at the picture with all the cuttings in containers, look at the back left, you’ll notice some very rooted Monstera adansonii cuttings. Whoops! Been probably 2 months since I put them in there. Since they were well rooted, I decided to use them to demonstrate my method for potting up rooted cuttings. The method is the same for any of the plants I mentioned earlier. I had to do some gentle untangling of the roots, because if you noticed, lots of cuttings with a lot of roots in a tiny jar.

I like to pot up my cuttings into 4 inch pots, and I don’t hesitate to reuse old pots from other plant purchases. My potting mix of choice is Miracle Gro, but feel free to use any high quality potting mix you have.
Here’s a neat little trick to help prevent the soil from falling out the bottom of the pot, coffee filters!

I just cut them into sizes to fit the pot and whamo! No more soil falling out the bottom.
I fill the pot with potting mix nearly to the top and then place the cuttings on top of the soil. I hold the cuttings with one hand to keep them in place and use the other hand to back fill potting mix, making sure that the roots are covered. As I mentioned earlier, I like to put 2 to 3 cuttings into a pot to make it look fuller, but you can always just go with one. For these gals, I went with 2 cuttings per pot since they where fairly large.

Here’s after I’ve backfilled.
Make sure to water them in and allow to dry slightly between waterings. Even though they were able to grow roots in straight water, just like any plant, if you over water and keep the potting mix overly saturated, you can suffocate the roots and cause root rot.
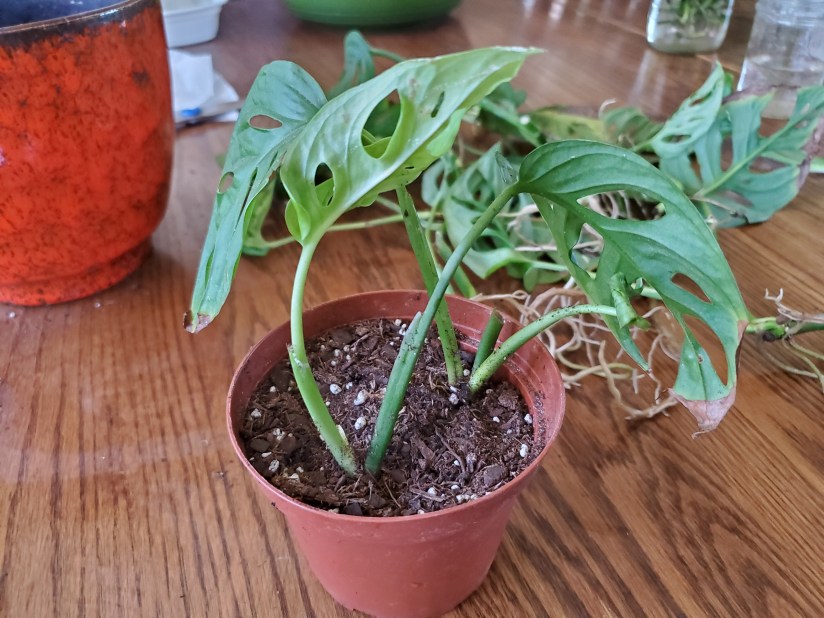
So, here I am with 7 – 4 inch pots of rooted Monstera adanosonii cuttings all potted up. Give them at least few weeks (it could be longer depending on the plant and growing conditions) to establish in their new home. Once they develop a healthy root system, you can transfer them to a different pot. Before moving to a different pot, make sure the roots have established and have grown into the potting mix first, and use judgement if they are ready to be transferred. When potting up, limit how big the pot is, it’s better to only increase an inch or 2 bigger.

Hoping that this little picture loaded tutorial is of use to you. Go forth and plant propagate!
